

Ready to kickstart your next big project?
Let's innovate together.
When we develop products we need to check the quality before delivering it to the customer. Accordingly, testing is necessary for us to ensure that our output meets the highest standard of quality available. Sometimes, if products are constantly being added to or updated with features, the number of test cases also increases along with these features. So, teams will need to check more details and take more time to make these products stable and of the highest quality.
This is the precise reason why we use automated testing. It ensures that teams can test efficiently and effectively.
The benefits of automated testing
- Reducing testing time. Whenever the team adds or updates the product, we won't need to start a new manual test.
- With faster validation cycles, we can reduce the time spent on waiting for feedback, this streamlines bug fixes and increases the team’s efficiency, adding more value in the process.
- Increasing test accuracy by reducing human error. Certainly, manual tests may lead to faults. Automated testing reduces these faults.
- Auto-creating test reports.
- We know the device's resource usage such as the memory, data, etc.
- Scalability – we can run parallel tests to make sure our product works find on various devices and platforms.
Real device vs. simulation
Testing on a simulator is easier and more flexible than on real devices. The main reason for this is we can test without real devices and can select the OS's version of the platform to test. That said, everything has pros and cons.
When our team was developing automated parallel testing, we ran into many problems. For example, simulators consume a lot of the host machine's resources, leading to unstable testing, mismatched UI between the simulator and real device, and sometimes the test itself can be unstable. These challenges inspired us to develop automated parallel testing on real devices.
After we developed, experimented, and ran tests, real devices turned out to be more stable and consumed much less of the host machine's resources when compared to the simulator. My laptop (MacBook Quad-Core Intel Core i7), for example, can run the parallel test with six real devices, both iOS & Android (maybe even more, we’ve yet to test the limits)
Real devices aren't flexible for changing OS versions like the simulator, but it's not a big obstacle since we can run a parallel test on both real devices and the simulator at the same time.
What is Appium?
Appium is a server-based, cross-platform automation testing tool. It's compatible with various platforms, programming languages, and test frameworks because the automated test can be used on many devices and configurations.
Why use Appium 2.0?
Appium 2.0 adds more features, and this version of the driver can be installed separately from the Appium driver. We can install the driver that we need to use, update, or remove it without changing the version of Appium. Moreover, Appium 2.0 has many new plugins we can use to improve our work in the future.
Prerequisites
- Some experience with Appium (you need to know where to set “device capability”).
- A project that is running one of the Appium client Library (https://appium.io/docs/en/about-appium/appium-clients/index.html )
- A project that is running iOS test with XCUITest driver capability setting (https://github.com/appium/appium-xcuitest-driver/blob/master/README.md )
- Apple Developer license (https://developer.apple.com )
Overview
Let’s dive into the details of the implementation Here’s a quick overview of what will be covered
- Install the Appium server – To run an Appium automation test, this is necessary.
- Set capabilities – Additional capabilities will need to be set if you are moving from a simulator to a real device.
- Configure your device – We need to prepare our Appium Client’s capability and our device to be ready and authorised for automation.
- Configuration for WebDriverAgent – This is where the magic happens. WebDriverAgent, will do the heavy lifting for communication with the Appium Server and automating iOS behavior.
Installing the Appium Server
- Since Appium is a server/client architecture, we need to have the Appium server running first. Install Node and npm (version >= 8.0.0 because Appium 2.x is required).
-
Download and setup Appium 2.0 with `
npm install -g appium@next`. - Install XCUITest driver for iOS `
appium driver install xcuitest` - XCUITest is UI testing framework for iOS, developed by Apple, faster than any other UI test automation tool, and it supports automated testing.
- Install `
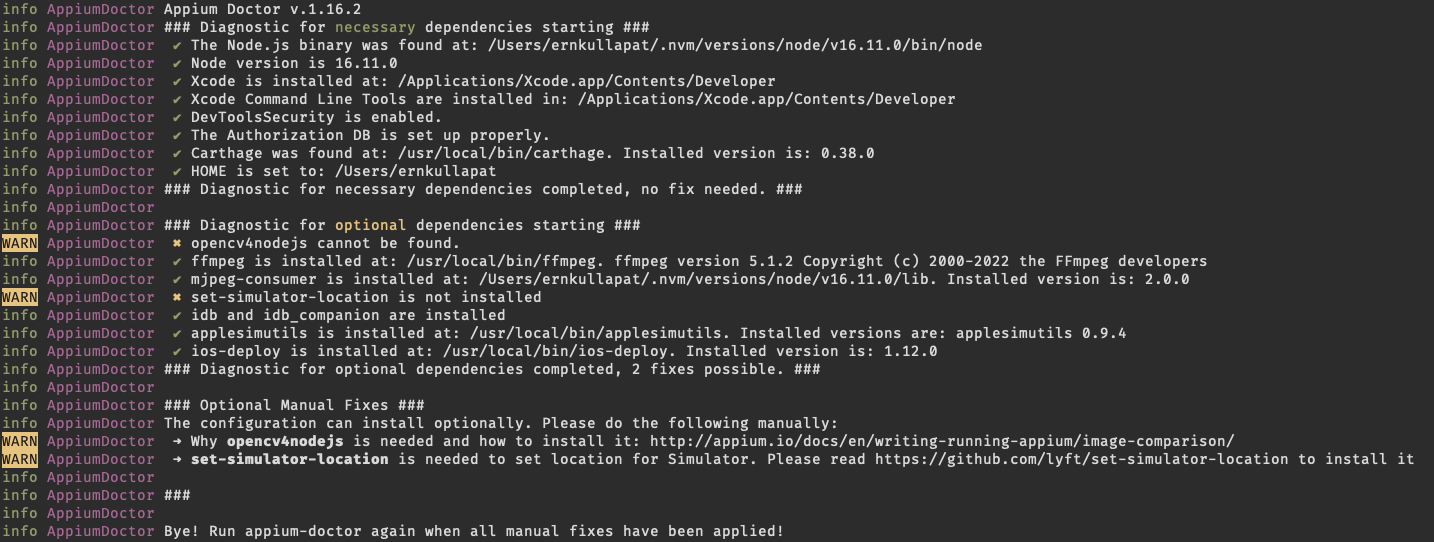
brew install carthage`Appium dependencies manager. - You can install the appium-doctor
`npm install appium-doctor -g`package for diagnosing Appium setup. Put this command into the terminal`appium-doctor --ios`
The result will look like the image below, it shows the necessary dependencies and those that are optional in your machine.
Set capabilities
If you want to migrate from simulator to real device, you'll need to change and add some of the existing capabilities.
- Get xcodeOrgId from the Apple developer with https://developer.apple.com/account/#MembershipDetailsCard
Then The Team ID is xcodeOrgId and xcodeSigningID, you can put capability settings in Appium’s config file
- You need to use `.
ipa`instead of `app`and change your absolute path to the application
Configuring your device
- The first time that you connect needs to be in developer mode. You can open the developer mode in your device through
Settings > Privacy & Settings > Developer mode ( IOS >= 16.0 ), Then the device will restart and ask you to confirm to turn on developer mode. - Developer mode will protect users from malicious software. In these cases, the device notification asks them to confirm that they're a developer, and aware of the risks of installing development-signed software. (https://developer.apple.com/documentation/xcode/enabling-developer-mode-on-a-device)

- For running Appium on a real device, you’ll need to get the device's UDID, which we can obtain through the below command in the terminal
` xcrun xctrace list devices`

The UDIDis used to configure the desired capability to identify the devices that we would like to run the automated testing.
After set up, your device will prompt you to run the test script. When you first open an app that you've manually installed, you’ll see the notification “Untrusted developer”, you can allow it by accessing Settings > General > VPN & Device Management ( IOS >= 16.0 )

Now, we’ve completed setting up our device, but in this case the test has not worked and the Appium server log shows us message ` info XCUITest xcodebuild exited with code '65' and signal 'null'` which means the code signing is incorrect. You need to manually configure WebDriverAgent as follows.
Configuring WebDriver Agent
WebDriverAgent is an iOS Webdriver server that can be used to remote control iOS devices, and it’s compatible with Appium. It allows you to tap, scroll, launch and kill applications. WebDriverAgent is developed and used at Facebook for end-to-end testing and has been successfully adopted by Appium. Let’s provision and authorize the WebDriverAgent as follows:
1. First, we’ll need to open the WebDriverAgent project in the Xcode. For Appium 2.X you can find the location of webDriverAgent.xcodeproj by using the command
` echo "$(dirname "$(find "$HOME/.appium" -name WebDriverAgent.xcodeproj)")" `
This will show the full path of WDA's source folder.
2. Go to the location path
`cd <PATH>`
Then run the following command to set the project. The next step is to put the command in the terminal.
`open ./`
The Finder will open the folder. We can then open WebDriverAgent.xcodeproj directly.
3. Select WebDriverAgentLib from the Target tab and check to select "Automatically manage signing" in the "Signing & Capability" tab and then select your Development Team. This should also auto-select the Signing Certificate. The outcome should look like this:

4. Select WebDriverAgentRunner from the Target tab and check to select "Automatically manage signing" in the "Signing & Capability" tab and then select your Development Team. This should also auto-select Signing Certificate. The outcome should look like this:

5. If the Bundle Identifier fails, you can change the name of the bundle, because the bundle ID is unique. If someone has already taken the ID, you’ll need to change it.

6. You can check if it’s a success by selecting Integration from the Target tab and building on your device.
7. Finally, verify that everything works by building the project with the command:
xcodebuild build-for-testing com.paloit.th.mobile.testfarm.automation.test-without-building -project WebDriverAgent.xcodeproj -scheme WebDriverAgentRunner -destination 'id=<udid>'
If this was successful, the output should end with something like:
com.paloit.th.mobile.testfarm.automation.test Suite 'All com.paloit.th.mobile.testfarm.automation.test' started at 2022-11-23 12:32:12.123
com.paloit.th.mobile.testfarm.automation.test Suite 'WebDriverAgentRunner.xctest' started at 2022-11-23 12:32:12.124
com.paloit.th.mobile.testfarm.automation.test Suite 'UITestingUITests' started at 2022-11-23 12:32:12.125
com.paloit.th.mobile.testfarm.automation.test Case '-[UITestingUITests testRunner]' started.
t = 0.00s Start com.paloit.th.mobile.testfarm.automation.test at 2022-11-23 12:32:12.126
t = 0.00s Set Up
`
To complete verification, you can try accessing the WebDriverAgent server status.
(Note: you must be on the same network as the device, and know its IP address, from Settings > Wi-Fi > Current Network) ` export DEVICE_URL='http://<device IP>:8100' export JSON_HEADER='-H "Content-Type: application/json;charset=UTF-8, accept: application/json"' curl -X GET $JSON_HEADER $DEVICE_URL/status `
You ought to get back an output that looks something like this:
`
{
"value": {
"state": "success",
"os": {
"name": "iOS",
"version": "16.0"
},
"ios" : {
"simulatorVersion" : "16.0",
"ip" : "192.168.1.114"
},
"build": {
"time": "Nov 23 2022 12:33:18"
}
},
"sessionId" : "8951A7BE-F0AD-416A-A8FB-D042F31F58E9",
"status" : 0
}
`
Tip : If you would like to run automated testing with the real device without a cable, you can set your device to connect with a machine by using WIFI.
Connecting an iOS device with WIFI
You need to use the same network for both your machine and device, connect the device with the lightning cable and open the Xcode. Then, go to Window > Devices & Simulators ( Cmd ⌘ + Shift ⇧ + 2 ) Then check “connect via network”.

After that, pull the lightning cable off and open Devices & Simulators again. You'll see the icon after the device name. This means you can now run the test via WIFI.

One limitation: the developer mode on iOS Devices is only available on iOS version 16.0 and later.
Conclusion
Automated testing on real devices, lets us know if the product has any bugs or problems, while using the same device your user is likely to use, while reducing testing time and consuming less of a machine’s resources than a simulator. consume the machine's resources less than the simulator.
To understand more about automating technical processes for better business outcomes, get in touch with our team of experts to learn what's possible.

References
https://github.com/appium/appium-xcuitest-driver/blob/master/docs/real-device-config.md
https://github.com/facebookarchive/WebDriverAgent