I am a Test Automation Engineer trying to look at other options apart from conventional Selenium…and finally came across Cypress! This post is all about explaining my first-hand experience with Cypress, a test automation tool.
Why Cypress?
Let’s look at a common example to explain how it works. We will open a Google webpage in Firefox browser and check for the Google Search button. To understand Cypress Edge, we need to understand Selenium Architecture first.
In a nutshell, this is the test automation process that happens with conventional Selenium.
Selenium consists of two components.
- Bindings: Libraries for different programming languages that we use to write our tests with.
- WebDriver: This is a program that can manage and fully control a designated and specific browser.
The important thing to note here is that these two components communicate over HTTP by exchanging JSON payload. This is well defined by WebDriver Protocol, which is a W3C Candidate Recommendation. Every command used in tests results in a JSON sent over the network.
This network communication happens even if the tests are run locally. In this case, requests are sent to localhost where there is a loopback network interface. First, a specific driver for the browser is initialised (WebDriver is an interface and Firefox Driver is Class Implementing Interface). Once the corresponding WebDriver is initialised, JSON Wire Protocol is called by Implementing class. In our case, Firefox Driver and session is created to execute subsequent commands first. Subsequently, Web Element Button is created and for each each action we give in language binding, JSON Wire Protocol is called, which travels on a network over HTTP.
Still Confusing? In short, for each line of Selenium code, JSON Wire Protocol is called and in turn, talks to the browser on network over HTTP methods (Get, Post, Put, Delete).
Bottom Line
The Selenium architecture works through the network and this brings delay, which can sometimes be significant.
Cypress addresses this issue by changing the process. Cypress has its own mechanism for manipulating DOM in the browser. Cypress runs directly in the browser, so there is no network communication involved. By running directly in the browser, Cypress has access to everything in the browser, including your application under test.
Selenium vs. Cypress
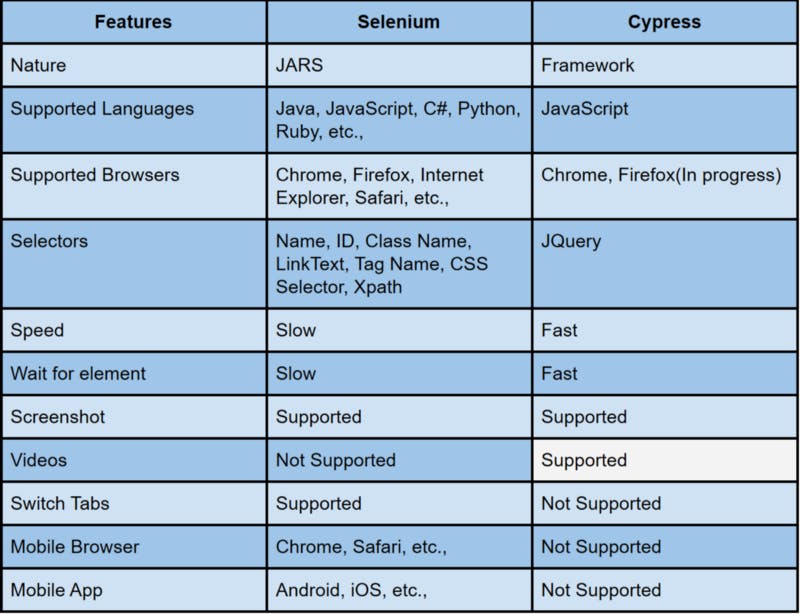
Cypress — Automation Testing Framework
- Cypress is an automation testing tool built for modern web applications like React, Vue.js, Angular, etc.
- Cypress is a test automation tool but not based on Selenium.
- It is basically different from Selenium. Selenium web driver works outside the web browser but Cypress works directly inside the browser DOM elements.
- Initially, it was developed for developers to do unit testing. However, it was later extended to testers to do end-to-end automation testing.
- Cypress test uses NPM for JavaScript. If you have experience with JavaScript, it is easy to work with Cypress.
Advantages
- Execution speed is high.
- Can capture videos and take screenshots.
- Easy debugging.
- Able to visualise which test and command is running in your app.
Disadvantages
- It only supports Chrome browser, Firefox(Inprogress).
- It only supports JavaScript.
- It does not support any native or mobile events.
Pre-requisites
- Install Nodejs.
- Install any IDE like Visual Studio Code
Let’s Play with Your First Cypress Test
1. Open Visual Studio Code IDE.
2. Create a Folder
3. Open a Terminal — Click View -> Terminal
4. npm init is the initialiser, which is used to set up a new or existing npm package. Type the command in the terminal as:
npm init -y

5. The command below is used to install the Cypress package. Type the command in the terminal as:
npm install cypress –save-dev
6. The command below is used to open the Cypress environment. Type the command in the terminal as:
./node_modules/.bin/cypress open

7. Click “OK, Got It” button in the Cypress GUI.
8. In Cypress GUI, we have default sample codes, and you can just click any one of the spec files. You will be able to view the automation test for the particular spec file.
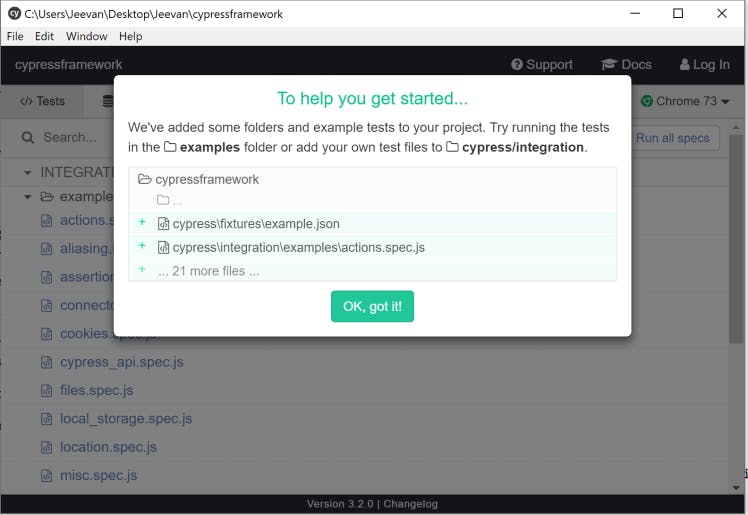
Now, enjoy the sweet feeling of successfully installing and running the Cypress test automation framework!
9. In your project folder, the structure should look like this:
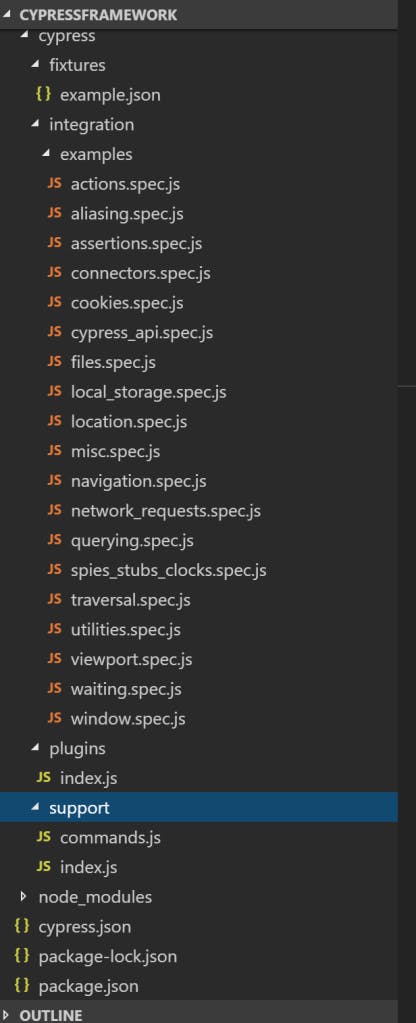
Let’s start with our scripts :
- Under the framework structure, we will store our spec file in the Integration folder. Delete the default Example folder and their scripts.
- Create a new script file name with the .spec.js extension (Example: test.spec.js)
├── cypress
│ ├── integration
│ │ ├── test.spec.js
Add the code below to your spec file (test.spec.js)
describe("Verify user should able to Search a keyword cypress framework in google", () => {
it("Launch", function() {
cy.visit('https://www.google.com/');}
);
it('Enter the search keyword',function(){
cy.get('.gLFyf').type("Palo IT").should("have.value", "Palo IT");}
);
it('Click on search button',function(){
cy.contains('Google Search').click();}
);
it('Verify the search title', function(){c
y.title().should('eq', 'Palo IT - Google Search')
})
});
Cypress has adopted the Mocha’s bdd syntax like describe(), context(), it(), etc,. It’s a very useful way to keep the tests easier to read like a feature file in Cucumber.
3. (A) Enter the command below in your terminal to run the script in Chrome browser.
./node_modules/.bin/cypress open
Cypress GUI should look like this, then click the link test.spec.js.
Your script will run and display the results in your Chrome browser.
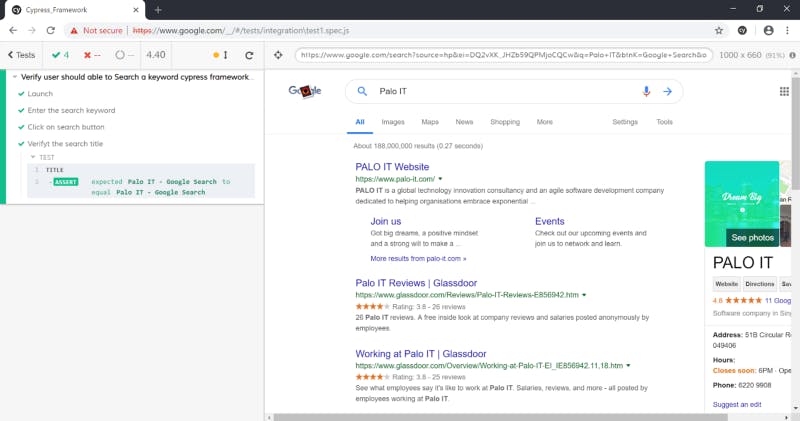
Close the Cypress GUI.
3. (B) Enter the command below in your terminal to run the script in Electron (Headless browser).
C:\Users\Jeevan\Desktop\Jeevan\Cypress_Framework> npx cypress run

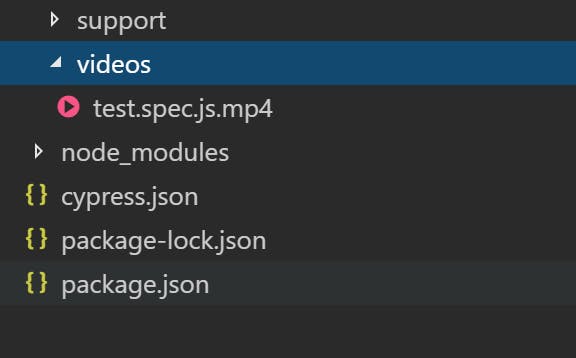
“Videos” are added automatically when you run in headless browser.
Finally, execute your written script in Cypress.
And that’s it! Thanks for reading and stay tuned for more updates about this topic!